

| Updated: Aug. 2015 |
|
|
|
Theta 50/51 |
||
|
With the Frontline "Theta" module you may
easily add a Durst Theta printer to your assortment of
automatic output devices. Frontline works together with the included Durst Theta "AutoSpooling" program, and you may define fixed and variable photocopy sizes as well as configure your workflow to enable automatic printing, and sorting (if applicable). Included is also support for all the various paper media, sizes, and surfaces that you offer your customers. |
||
|
1. Install the Theta 50/51 printer. |
||
|
A. Please refer to the Durst
installation manual/representative for general Theta installation instructions. |
||
|
2. Configure the Theta printer as an
export device on Frontline. |
||
|
A. On the Frontline computer, create a
new folder named "Theta". |
||
|
B. Within this newly created Theta
folder, create and share with administrative permissions, a new folder named "Spool" and a new folder named "ASCII". |
||
|
C. Locate the Frontline "Theta" plugin
settings (Settings/Plugins/Theta). |
||
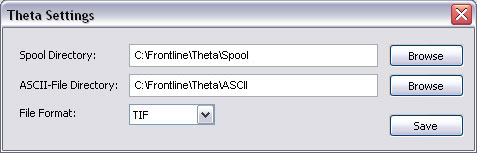 |
||
|
D. Enter/Browse to the Theta "Spool"
folder located on the Frontline computer. E. Enter/Browse to the "ASCII" folder located on the Frontline computer. F. Define the exported image "File Format" as TIF. G. Select "Save" to save your settings. |
||
|
3. Adding Frontline as a Theta input
device. |
||
|
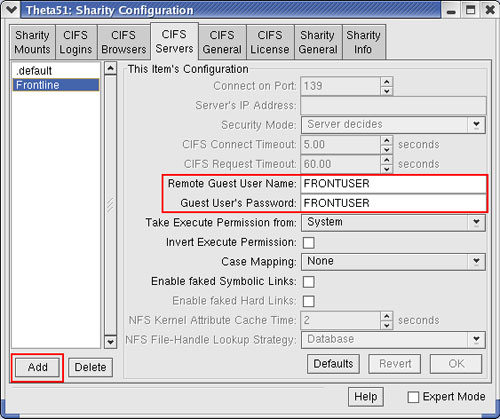
A. Within the Durst Theta 50/51 Sharity
program, locate the "CIFS Servers" tab and "Add" the name of the Frontline computer (i.e., FRONTLINE), being sure to login using a Frontline Administrative user. |
||
 |
||
|
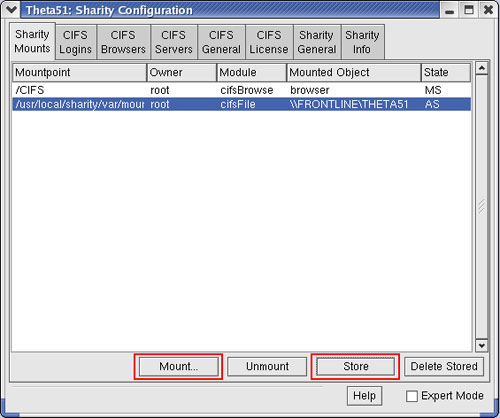
B. Under the "Sharity Mounts" tab,
select "Mount" to make the ASCII and Spool folders on the Frontline computer available, being sure to "Store" the mounts afterwards for their usage. |
||
 |
||
|
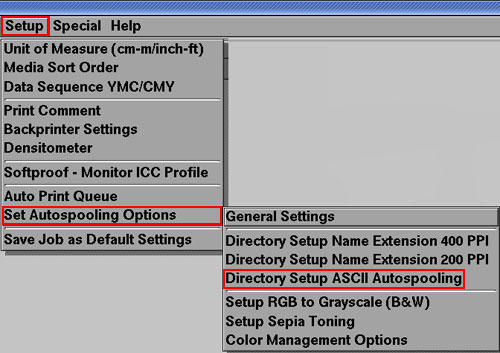
C. Launch the Durst Theta software and
under the "Setup" menu, go to the "Set Autospooling Options / Directory Setup ASCII Autospooling" menu. |
||
 |
||
|
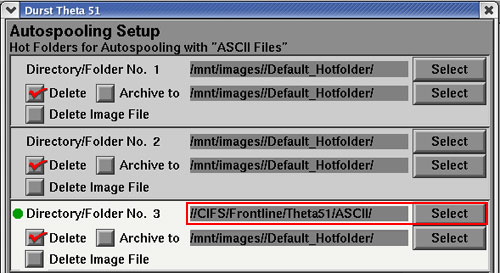
D. Choose the applicable
"Directory/Folder number" for the paper channel and "Select" the mounted Frontline "ASCII" folder. |
||
 |
||
|
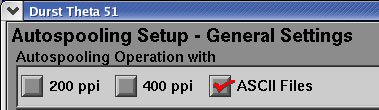
E. Under the "Setup" menu, go to the
"Set Autospooling Options / General Settings" menu, being sure that "ASCII Files" is activated. |
||
 |
||
|
F. Within the Theta "Queue Manager"
program, start the "Autospooling" feature to allow the Theta the ability to automatically receive Frontline orders. |
||
|
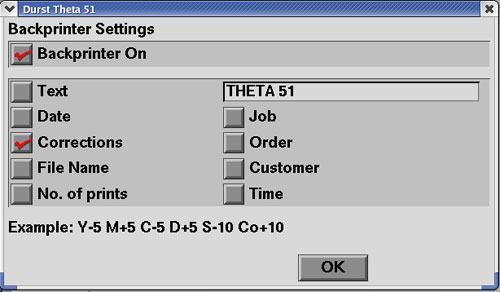
G. To enable backprinting, select the
"Backprinter Settings" field from the "Setup" menu of the Theta "Queue Manager". H. Select "Backprinter On" and be sure to mark the "Corrections" field. |
||
 |
||
 |
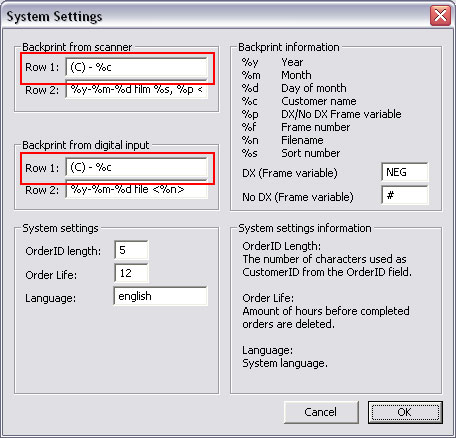
As the Theta printer supports a
single backprint row with ASCII file input (32 characters),
Frontline will apply the default parameters specified within
the Frontline/Settings/Main "Backprint from scanner Row 1"
or "Backprint from digital input Row 1", unless specified
otherwise. |
|
 |
||
|
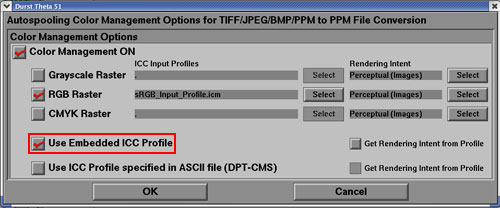
I. If using Frontline for the ICC color
management, be sure to select the "Use Embedded ICC Profile" option from the Theta "Autospooling Color Management Options" menu. |
||
 |
||
|
4. Parameters for the Theta driver
within the Frontline/Codes/Parameters field |
||
 |
||
|
1. clip=(true/false/yes/no) Used for images that contain different proportions than the desired print format. A. true/yes = "fill out" properties, and may result in image clipping. B. false/no = "fit in" properties, and may result in white edges applied above and below the image. 2. width=(mm) Desired photocopy width amount within millimeters (i.e., width=102mm). 3. length=(mm) Desired photocopy length amount within millimeters (i.e., length=152mm). 4. res=(200/400) Resolution amount of the applicable output printer (default=200). 5. fullsize=(true/false/yes/no) Used if printing images in the size they are saved in. |
||
|
|
When the "fullsize" parameter is
set to true, the image size is variable and set by the
document size of the image. This parameter should not be
used together within the same code, with fixed size
parameters (height/width). |
|
|
6. header=(true/false/yes/no) To turn on/off the Theta header image for each order. 7. barcode=(true/false/yes/no) To turn on/off the Theta barcode used for cutting. 8. ticket=(path location of any additional ASCII files) Used if wishing to send the ASCII file to another location other than the one defined within the Frontline Theta plugin field. |
||
 |
You may use the "ticket" parameter
to define separate Frontline codes for different paper
surfaces, media, size, (i.e., Matt/Glossy/Metallic/Flex).
Each ASCII folder location will need to be pre-defined
within the Theta "Directory Setup ASCII Autospooling" (i.e.,
ASCII_Matt, ASCII_Glossy) and you may alternate between
enabling different ASCII folders depending on which material
is currently loaded in the Theta. |
|
|
9. ticket2=(path locaiton of additional
ASCII files when used in conjunction with load balancing) When load balancing is being performed between two Theta machines, you must define the "ticket2" parameter for the other applicable ASCII folder. 10. lb=(true/false) To turn on the load balancing feature between two machines. |
||
|
|
You may use the "ticket2" and "lb"
parameters to balance the order load between two Theta
printers. This will allow you to evenly spread the workload
between two (or more) machines (per order). |
|
|
11. useinfofilenames=(true/false, default=false). Defines the .mrk ASCII file and Spool file names as order name. 12. bp=(1/2/3/4) To define the backprint. A. bp=1 = Single backprint line (using BackprintRow1 set within the Frontline Main settings). B. bp=2 = Double backprint line (fixed length using BackprintRow1 and BackprintRow2 set within the Frontline Main settings). C. bp=3 = Double backprint line (using wrap feature and BackprintRow1 set within the Frontline Main settings). D. bp=4 = Single backprint line (used for older ASCII support generating the PRT CMT parameter). |
||
|
13. profile=(ICC profile path location) Enter the path location for the applicable ICC profile. |
||
|
14. intent=(-1/0/1/2/3) Specifies the rendering intent used to convert the applicable color profile (default=-1). |
||
|
|
To allow for user familiarity, the
Frontline ICC color engine and rendering intents are similar
to those that are found in Adobe Photoshop. |
|
|
A. -1 = Source Intent The rendering intent that is specified in the image's source file is applied. B. 0 = Perceptual (Default) Perceptual rendering is intended to preserve the visual relationship between colors so that they are perceived to be as natural to the human eye as possible, even though the color values themselves may change. C. 1 = Relative Colorimetric Relative Colorimetric rendering compares the extreme highlights of the source color space to that of the destination color space and shifts all colors accordingly. D. 2 = Saturation Saturation rendering is intended to produce vivid colors in an image at the expense of color accuracy. E. 3 = Absolute Colorimetric Absolute Colorimetric intent will leave the colors that fall inside the destination gamut unchanged, whereas the out-of-gamut colors are removed. |
||
|
15. bpc=(true/false/yes/no) Specifies the application of black point compensation (default=true). Black point compensation is used to determine whether or not to adjust for the differences in black points when converting colors between the color spaces. |
||